Your one-stop guide to mobile wallets

Using a mobile wallet can be a game changer — many folks wonder how they ever got by without it. And unlike a physical debit or credit card, you don’t risk losing it or having your information fall prey to prying eyes. The biggest hurdle for many is just getting it set up, and that’s probably much easier than you think.
You can easily push your UBT debit card to your device’s mobile wallet from within UBTgo. Simply log in to UBTgo, then navigate to Debit Cards. From there, click the prompt under the card image to add it to your mobile wallet, confirm your card’s information when prompted, then click Add to Mobile Wallet.
Alternatively, you can use the Wallet app that comes preloaded on your smartphone, which you can locate using your phone’s search function. If your phone doesn’t already have a Wallet app, you can easily find a good option in your device’s app store. Once you’ve located or downloaded your phone’s Wallet app and are ready to add your debit or credit card(s), see step-by-step instructions for your device type below.
It’s important to note that these instructions are meant to be a guide, and that your experience may vary depending on your phone’s make and model; if you have any questions, we recommend consulting your device manufacturer’s website.
iPhone® Wallet/Apple Pay® instructions
Samsung Pay™/Wallet instructions
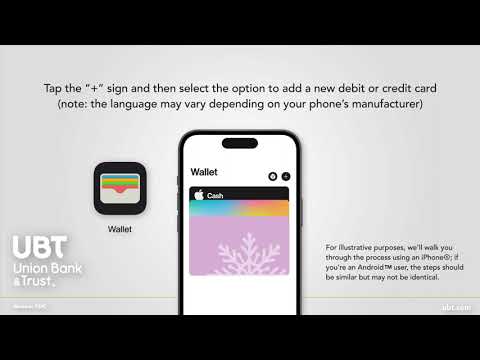
More of a visual learner? Check out this video for a general guide on adding payment methods to a mobile wallet.

iPhone® Wallet/Apple Pay® instructions
- Open the Wallet app on your iPhone. There should be nothing to download — Apple Pay and the Wallet app are built into your iPhone, Apple Watch, or iPad.
- Tap the plus (+) sign. (Note: You may be asked to sign in with your Apple ID.)
- Tap Debit or Credit Card, tap Continue, then position your card so that it appears in the camera frame. If you have difficulty aligning the card or simply prefer to enter the details manually, you can choose to key in your information.
- Double-check to make sure your name is spelled correctly and all digits are correct, and key in any missing info as needed.
- A message will appear that your card issuer is being contacted — this is a standard verification process.
- You will be asked to agree to the terms and conditions of the application. Additionally, if you have multiple cards loaded in your Wallet app, you’ll be prompted to select whether you would like this new card to be your default payment method.
Once your card is set up, you can use the Wallet app to manage your payment types, such as removing an expired card, adding additional cards, or adding previous cards (such as a card associated with your Apple ID, cards you use with Apple Pay on other devices, cards you added to Safari AutoFill, or cards you removed from Wallet).
When you’re ready to pay with Apple Pay, open your Wallet app and select the card you want to use. With the card selected, verify your identity via Touch ID, Face ID, or your passcode. Then, hold your device near the payment terminal to initiate the payment. Within a second or two, your payment information will be transmitted to the bank.

Google Wallet™ instructions
- Open the Google Wallet app. (If it’s not already installed, you’ll need to download the Google Wallet app from the Google Play store.)
- At the bottom, tap Add to Wallet +.
- Tap Payment card. Any cards you have saved to your Google account will be displayed.
- Tap New credit or debit card. To add a card, use your camera to scan the card, or tap Or enter details manually.
- Double check to ensure your name is spelled correctly and all digits are correct; key in any missing info as needed. When you’re ready, at the bottom, tap Save and continue.
- Read the Issuer Terms and tap Accept.
- If you’re asked to verify your payment method, choose an option from the list. You can learn more about this step here.
Once your card is in your wallet, you can choose to make the card the default for contactless payments. If you want, you can also set a nickname for the card by tapping Add Nickname. If you previously added cards, tickets, or passes to your wallet with Google Pay, they should appear in your Google Wallet. You can also follow these steps to add loyalty cards and use Google Pay for online purchases.
You may be asked to set up a screen lock on your Android device — an added security measure, and one we would recommend.
When you’re ready to pay, unlock your device and hold it near the terminal. When you’re within an inch or two, you should hear a beep or feel a vibration and a checkmark will appear on your phone or watch. That’s your indication that your card information was transmitted and received by the payment terminal. You’re good to go!
Tip from Google: To make contactless payments, make sure your phone meets software standards, that it has NFC, that NFC is turned on, and that Google Pay is set as the default payment app.

Samsung Pay™/Wallet instructions
- Open the Samsung Pay app. If you don’t already have it on your device, you can download Samsung Pay from the Google Play store.
- Tap the menu (the three horizontal lines) in the top left corner, then tap Cards.
- Next, tap Add Card; it looks like a credit card with a plus sign next to it. Then, tap Add credit/debit card.
- Follow the instructions to register your card and agree to the terms and conditions.
- You’re ready to use your card! And you can add up to nine more (10 total).
Once your card is set up, you can use the Wallet app to manage your payment methods, remove or edit expired cards, and more.
To use Samsung Pay, swipe up from the bottom of the display to open Samsung Pay, then tap the Fingerprint or Iris button if you have Samsung Pay secured with the biometric sensor, or the PIN button if you want to enter your PIN. Touch the back of the phone to the payment terminal or card machine as indicated.
Helpful tips
To make the most of your mobile wallet experience, there are a few things we recommend keeping in mind:
- Ensure your device has NFC (Near Field Communication) enabled for contactless payments.
- Most mobile wallets require authentication methods such as fingerprint or PIN for added security.
- In general, to make a payment, simply hold your device near a compatible terminal and authenticate as prompted — you’ll get the hang of it quickly!
- Remember to keep your device secure, update your mobile wallet apps regularly, and monitor your transactions for security purposes.
Why use a mobile wallet?
If you’ve been hesitant to take the plunge with a mobile wallet, we totally understand — what’s the value in adding one more thing to your already busy digital life? Well, it turns out mobile wallets actually have a lot to offer the average consumer. Here are some of the best reasons to add your debit or credit card to your mobile wallet.
Security. With a mobile wallet, your actual card details are not directly shared during transactions, which significantly reduces the risk of fraud. What’s more, mobile wallets use advanced encryption and authentication methods, such as biometrics or PINs, to keep your information even safer.
Contactless transactions. Mobile wallets are touch-free, with no swiping or “dipping” (like with a chip card), meaning you don’t have to touch much more than your phone — and nobody likes germs!
Speed and convenience. Mobile wallets are about as quick and convenient as you can get — and without the need for physical cards or cash. This makes it fast if you’re in a long line or a crowded venue, and super handy if you stop to make a purchase and don’t have your purse or wallet on you. Simply tap your device at a compatible terminal to complete transactions.
Reduced physical clutter. Using a mobile wallet means carrying fewer physical cards, reducing the need for a bulky wallet and the risk of losing cards. Plus, many mobile wallets allow users to integrate and manage loyalty cards and reward programs in one place, making it easier to earn and redeem rewards during transactions. You can even add digital tickets for things like concerts, sporting events, or flights.
Ultimate online shopping. Mobile wallets streamline the online shopping experience. With saved card information and the ability to use biometric authentication, purchasing items online becomes quicker and more secure.
If you want a faster, convenient, and more secure way to pay, or just want to leave your purse or wallet at home, a mobile wallet could be the answer. Need help adding your UBT debit and credit card to your mobile wallet? We’d love to talk you through it! Stop by your nearest branch, or contact our Customer Support team today.


Learning Center articles, guides, blogs, podcasts, and videos are for informational purposes only and are not an advertisement for a product or service. The accuracy and completeness is not guaranteed and does not constitute legal or tax advice. Please consult with your own tax, legal, and financial advisors.
iPhone®, Apple Pay®, Apple®, and App Store® are registered trademarks of Apple Inc.
Samsung Pay® is a registered trademark of Samsung Electronics Co.
Android™, Google Play™, and Google Play logo are trademarks of Google LLC.
